
How to Create a Cozy Frog Landscape in Your Sketchbook

Creating a cozy frog sketchbook page is a perfect way to explore illustrative landscapes while embracing a limited color palette.
This type of artwork allows you to focus on the details of nature and the peacefulness of a frog's natural habitat, all while honing your illustration skills. Whether you're a beginner or an experienced artist, this style is both relaxing and rewarding.
Embracing a Limited Color Palette
One of the core techniques used in this tutorial is the limited color palette. Using a small selection of colors helps create a harmonious and cohesive look across your entire artwork. When working with a limited palette, the key is to balance your colors to avoid overwhelming the scene.
For this illustration, you could choose earthy greens for the trees and frog, blues for the water, and a few accent colors like orange and yellow for the fish and plants.
The beauty of using a limited color palette is that it forces you to be more creative with the colors you choose, finding ways to make them work together to tell a story.
Why a Limited Palette Works
Working with a limited color palette helps you to focus on the composition and structure of your art.
It encourages you to explore contrasts and shades within a few key colors, allowing the details to shine without being lost in an overwhelming array of hues. A limited palette also makes it easier to create a unified look that flows throughout the illustration.
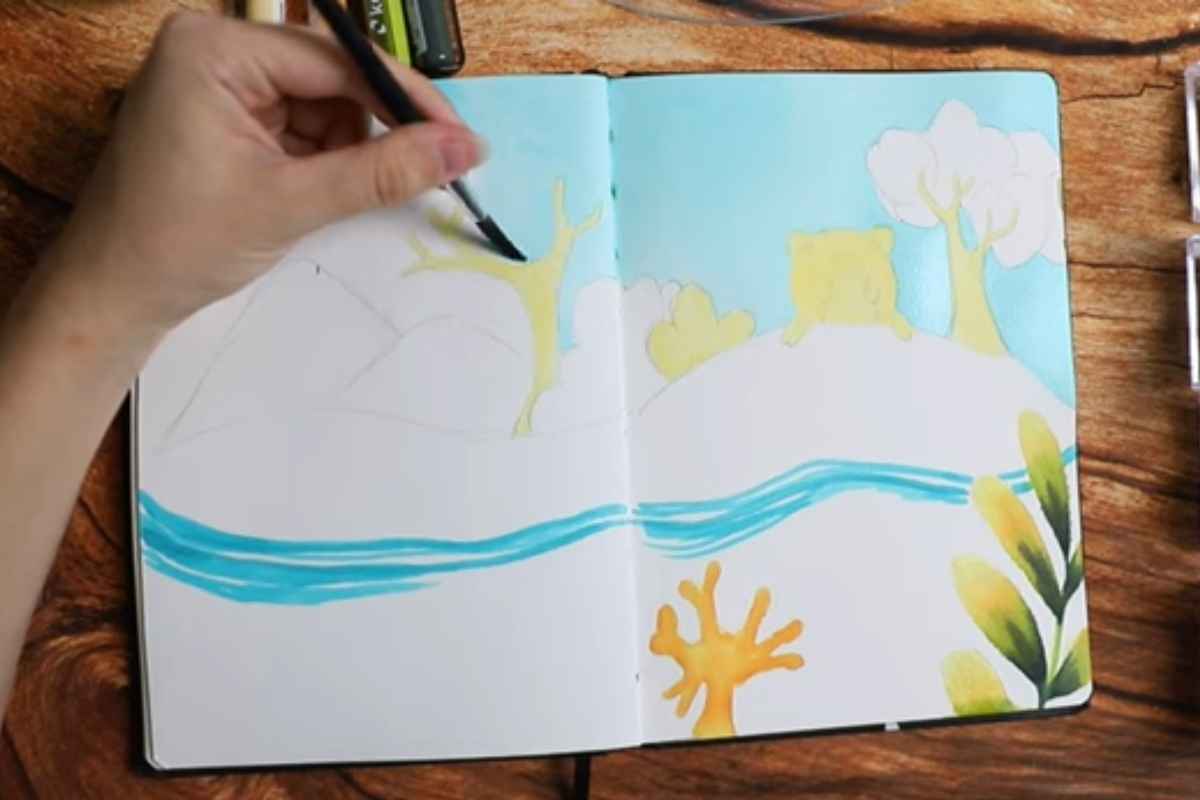
Sketching the Scene: A Peaceful Frog Habitat
The foundation of any good illustration starts with a strong sketch. In the case of the frog sketchbook page, you are creating a peaceful, nature-filled scene. Imagine a tranquil pond surrounded by lush greenery, with a frog sitting contentedly amidst the foliage.
Start with Simple Shapes
In this landscape, begin by sketching the basic shapes of the trees, mountains, and water. The frog can be placed in the center or at a focal point, ensuring it remains the star of the composition. Loose lines are the best way to start, giving you the flexibility to adjust as you build upon the design.
Once the outline of the scene is established, you can refine the details. Add the rippling water, soft cloud patterns, and shapes of the plants and trees that will frame the pond. It's important to keep your lines soft and flowing, which complements the relaxed feel of the scene.
Creating Depth and Interest
The next step is to create depth in your artwork. In the case of the frog sketchbook, you can achieve this by adding layers of plants, trees, and reflections in the water.
Use lighter and darker tones within your chosen palette to indicate areas of light and shadow. This layering technique will give your artwork a 3-dimensional feel, bringing the scene to life.

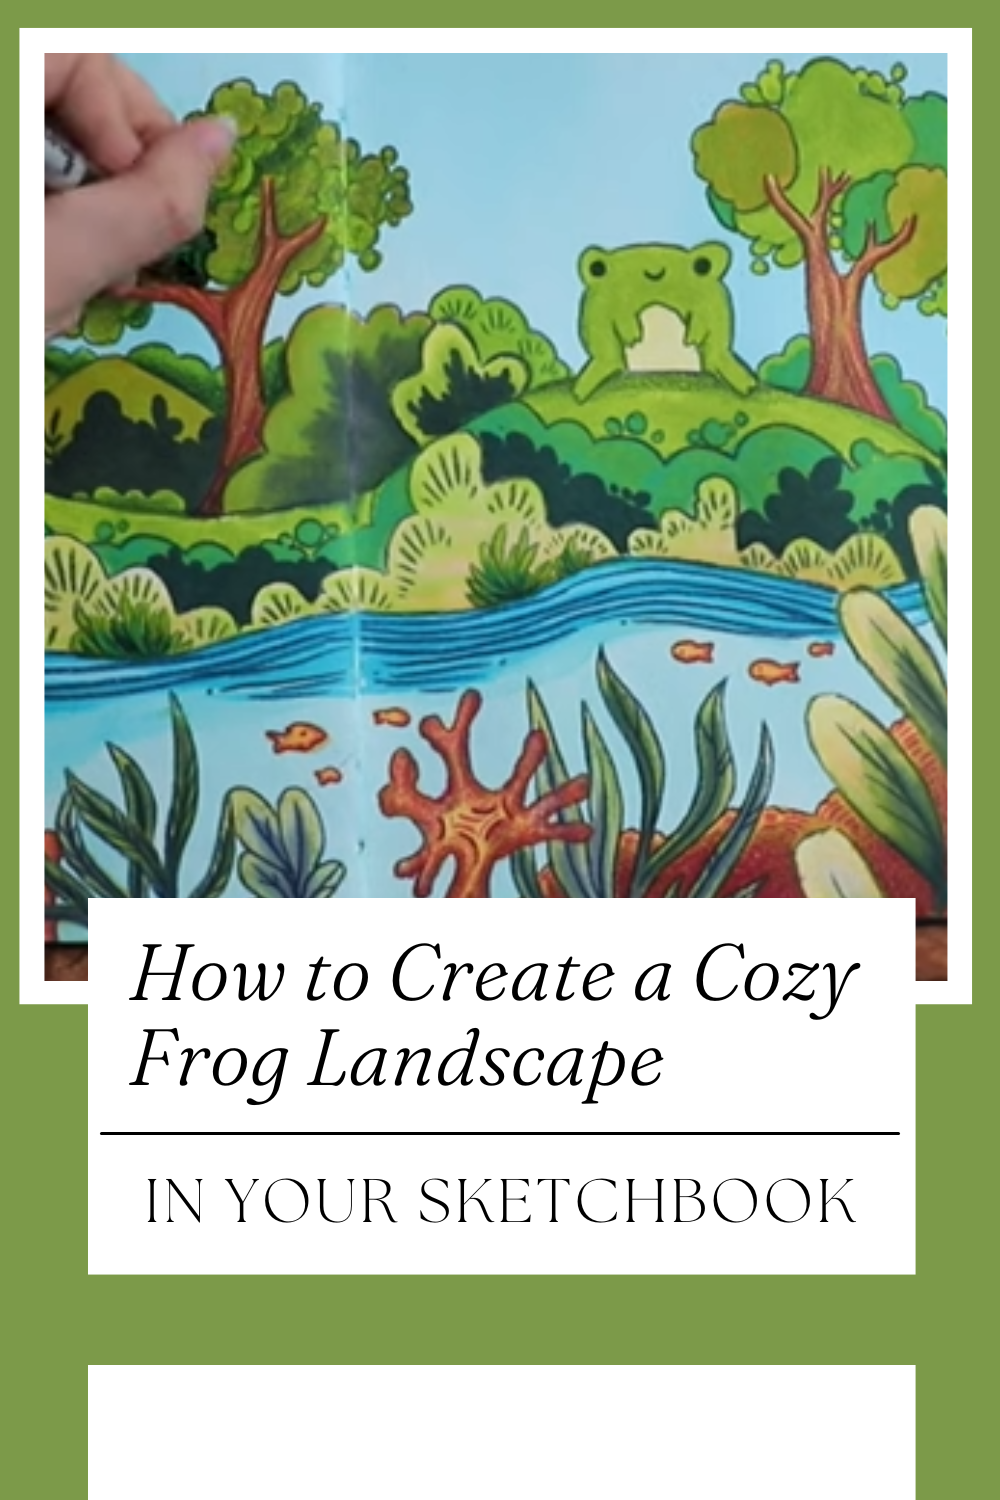
Focusing on Details: The Frog and Surroundings
With the main structure of the scene in place, it's time to focus on the details that will bring the illustration to life. The frog should be the central element, so use shades of green to give it a vibrant look.
You can enhance the frog's facial features, adding a bit of texture to its skin to make it appear more realistic, or keep it more stylized depending on the style you're going for.
Adding Texture and Movement
Adding texture to the plants and trees will enhance the overall atmosphere of the scene. You can use a combination of brush strokes or colored pencils to add depth and dimension to the leaves and plants around the frog.
The water can be lightly textured with gentle brush strokes to give it a flowing and calming effect, with small ripples showing the movement of the water.
Don't forget the little details like fish swimming in the water or small flowers growing along the pond's edge. These elements, while small, can add a lot of character to the scene and help tell a story.

Final Touches: Enhancing the Scene
Once you have filled in all the key elements, it's time for the final touches. You can use a darker color to outline certain parts of the scene, creating contrast and drawing attention to specific areas, such as the frog or the water’s edge.
A bit of white paint can be added to highlight the shimmering reflections on the water’s surface or the light reflecting on the frog's body.
Adding Highlights and Shadows
The addition of subtle highlights and shadows can dramatically change the look of the scene. Use a lighter color to add a soft glow to areas where the sunlight might be hitting, such as the tops of the trees or the ripples in the water.
Shadows underneath the plants or along the bank of the pond can create a deeper atmosphere, helping the scene feel grounded and real.
Conclusion: The Joy of Limited Color Landscapes
This frog sketchbook page is a wonderful example of how using a limited color palette can create a visually striking piece of art.
By focusing on simple shapes, earthy tones, and natural textures, you can capture the peacefulness of the environment around the frog and create an illustration full of life and movement.
Whether you’re an experienced artist or just getting started, the limited palette technique is a fantastic way to improve your skills, create depth, and tell a story through your artwork.
So grab your supplies and start sketching your own peaceful frog pond, bringing a relaxing and serene landscape to life.
We thank Visual Mind for the images.
Enjoy The Video Tutorial

Source: Visual Mind
Did you find this post useful or inspiring? Save THIS PIN to your Art Board on Pinterest! 😊
Discover More Artistic Inspiration